Thursday, June 29, 2017

Eating Only What I grow Blog Post #3


Post #3 of One Year of Eating Only What I Grow.
Things I think I'm going to miss.  I really cannot be sure what I'm going to be craving while I'm in the midst of this journey.  This list is what I feel right now, as I am still eating whatever I want, is what I'll miss about eating only the stuff I've grown. 
Number One!  CHEESE!  When a recipe goes wrong, usually just add cheese and it will make it edible at least.  Cheese makes the blandest food taste better.  Cheese can be an ingredient, and cheese can be the star in the food.  Grilled cheese, mac & cheese,  this may be something I miss.
My second regret:  Johnson Estate Wine.  Even though I'll be attempting to make enough of my own wine from grapes, wild and domestic, and blackberries and possibly beer from the hops I grow, I'll miss just going to the store and buying my favorite wine.  Proprietor's Red wine from Johnson Estate in Westfield, NY is probably my favorite.
Number Three:  Pistachios.  I love them.  You can eat a handful and be totally satisfied because they have salt and fat.  Plus, it takes time to crack them open.  Unlike other snack food where you could have eaten 3,000 calories before you feel like you've eaten anything at all.
Four:  CEREAL.  I know, cereal is bad.  Don't judge me!  I've loved cereal since childhood.  Sometimes the only way my mother could get me out of bed in the morning for school was the promise of cereal.  I loved all the bad ones we had at the time.  Count Chocula, Boo Berry, Frankenberry,  (I also loved horror movies, LOL) and Fruity Pebbles were a staple.  Of course, I really don't eat this stuff now, except occasionally, but I could if I wanted to.  In 2018, however, I am shut down from all cereal.  Bummer.
Are we on #5 already?  Avocados.  Avocados have a creamy texture and a lot of fat and they are my go to food when I have sugar cravings.  Keep that in mind.  They are the reason (besides sugar free peanut butter) that I am off sugar to this day.
Peanut Butter:  Although not a daily PB eater, the sugar free natural PB is another thing I grab when I crave sugar.  Fats are very satisfying. 
Number Seven:  Burritos.  Preferably bean burritos.  Although I could probably make masa for tortillas or some other hack for a tortilla, I'm going to miss burritos because I eat them all the time.  I'm a big fan.  Maybe I'll plant some corn to grind for a really (and I mean Really!) primitive form of tortilla.  Okay, ordering corn seeds!  Non Gmo of course!
Number Eight.  Sour cream.  This goes hand in hand with burritos.  I love refried beans and sour cream.  I cannot help myself.  Maybe I can barter with Chipotle.  LOL.
Number Nine.  Pizza.  Goes without saying.
I know most of you are thinking... what?  No meat cravings?  Truthfully, I am very lucky.  I was born without cravings for meat and I think that may be one of the reasons I'll be able to conquer this 365 days of the unknown, home grown, seed sewn adventure I face in the coming year.  I really have always felt better when I follow a meat free diet. 
I'm wondering if... possible a totally natural, ages old diet will just about suit me perfectly.
Am I still up for the challenge?  Absolutely!

What would you miss?

Thursday, June 22, 2017

Countdown to One Year of Eating Only What I grow. 194 days to go


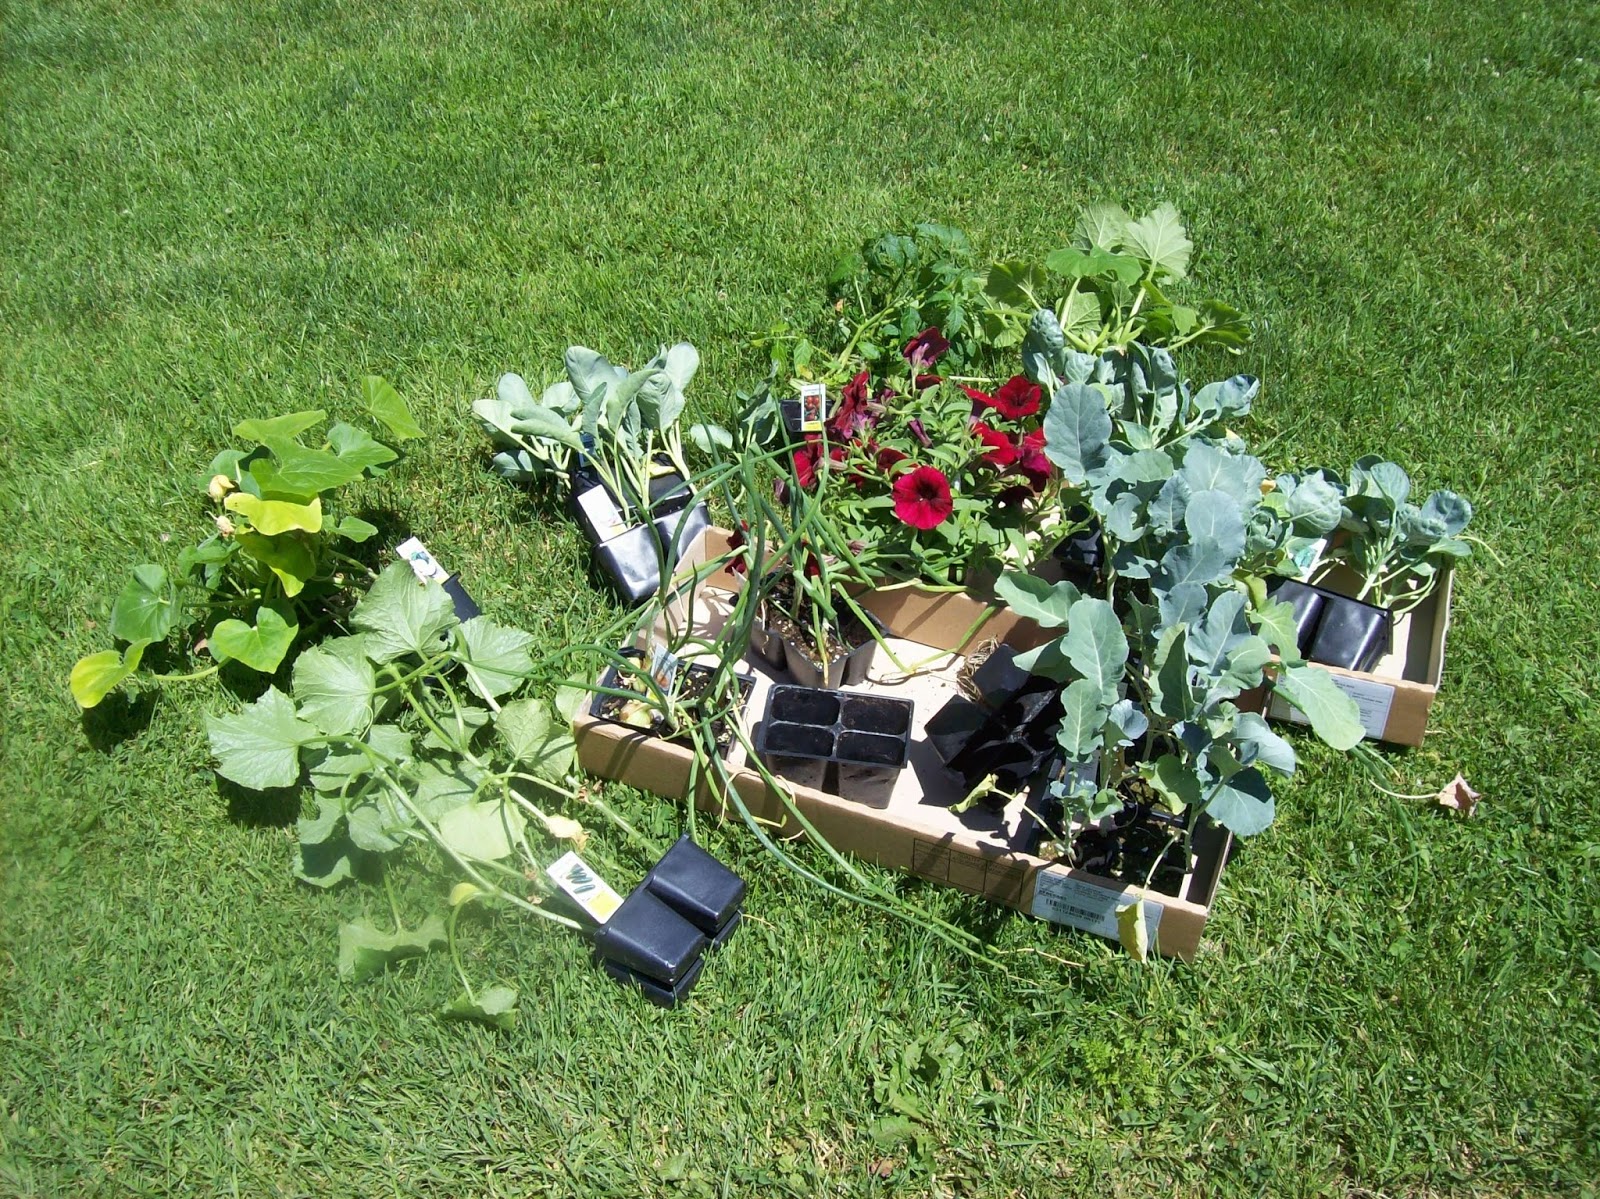
Preparation day #1.  194 days to go.  It just happens to be the first day of summer today and I feel it's starting off well.  I already have some things planted in the garden but today I really stepped it up a little and went to a greenhouse near me to buy some already started vegetable plants.  Now is a great time to get really inexpensive plants.  This particular nursery was having a buy one get one free sale, because it's late in the season, so their 4 pack vegetable starts were $1.49 each originally and you get one free.  So about 75 cents for 4 plants doesn't seem too bad.  They are a bit leggy, but anyone who grows vegetables knows how to get them (especially tomatoes) to grow out of their legginess.  ( I just made up that word).  Plus, they're too big for those pesky slugs to devour in one sitting.
So, today I planted 12 broccoli plants
7 cauliflower
12 brussels sprouts
8 hot portugal peppers
4 yellow summer squash
4 cherry tomatoes
a handful of onion sets
I still have 4 acorn squash plants to plant, a few more onions, a few more tomatoes and orange peppers, and a few other things.  The things I bought today are just additions to what I've already planted.  The latter being things I just wanted to plant, before I came up with this crazy idea to eat only what I grow for a year.  !!!  The other things I've planted, or have yet to plant are things I grew from seed.  I love heirloom varieties and I buy from Baker Creek Heirloom Seed Company every year.  Their varieties are old fashioned, open pollinated and non gmo.  The plants I bought today were not grown organically from the start, but I felt I needed to bulk up for the year I have in front of me.
I have lots of other seeds to still plant also.  I have late varieties like cabbage, swiss chard, collards, turnips and a few other things.  Some things I can grow later and keep in the garden to harvest all winter when I need it.  A few years ago, I had turnips that I left in the garden all year.  The turnips would grow tops during the warmer days of winter and I'd be able to eat fresh greens even during winter with no covering.  It was awesome.  There was so much, I was feeding it to my dogs too.  Actually I think I blogged about it...
Right now, already in the garden, and growing beautifully, I have a huge patch of Japanese Red mustard Greens, celery, orange bell peppers, potatoes, 6 Roma tomato plants, 4 burpless cukes, 4 butternut squash, about a 30 foot row of beans, 20 foot row of cilantro, radishes, 9 patty pan, zucchini and yellow squash plants, 18 foot row of beets, and a patch of turnips.  I'm not mentioning the berries, grapes, apples that are perennial plants.
So, planting aside, I've started drying herbs for the winter.  I won't have milk, or juice or anything else to drink for a year, and I'm a lemon water drinker, so I have to prepare for hydration.  Water is good but I love making tea from stuff that grows in my yard.  And it's easier for me to drink something with some kind of flavor. 
Today, I dried birch leaves, rose petals from my old antique fragrant rose bush and red clover for my winter teas.  I bought a HUGE mesh dryer for herbs.  I found one of these herb dryers on Ebay that I have hung from the rafters in the attic.  It's very warm up there and these leaves and flowers should dry in a few days and then I can pack them in glass jars for storage.  I paid about $25 for this dryer.  It's fabulous.  It's got 6 layers so you can dry different leaves in each layer.  It's 36" in diameter and has a lot of space. They have smaller ones on Ebay too if you don't have the room.   I dry flowers and leaves for potpourri's on this thing too.  I still love my antique wooden drying racks too, but for a year's worth of dried leaves, I think my investment is worth it.  I'll go up there once a day and mix up the plant material so it all dries evenly and nothing sticks together.  When the leaves are COMPLETELY crispy they can go into glass jars.  I have to make sure there is no moisture because the slightest bit will cause mold to form and it will ruin my whole batch.
Every day or two I'll pick a new leaf or flower for my tea mix.  This tea is not only really delicious, but it is also packed with vitamins and minerals.  Has no caffeine and it's free.  I'll be talking about this in more detail, but some of the other things to add to this tea is my lemon balm, mints, catnip, dandelion leaves and flowers, oak leaves, oregano, thyme, and all sorts of flowers.  Just to name a few.  A few herbs like mint, lavender and catnip are great at bedtime to help with sleep.  As I go, I'll share my recipes with you for the teas, so you can make them yourself.  And I hope you will!  It's very rewarding.
I think that's all for today.  I'm still excited about this journey!  I hope you'll follow me.  I'll be using these blog posts to narrate videos of the garden on Youtube and I'm also theblueladyofthelake on Instagram.

the plants I bought

birch leaves

the drying rack in my attic


Rose petals


clover

Tuesday, June 20, 2017

A year of eating only what I grow, the preparation


This may be the absolute most difficult thing I've ever done.  And for a whole year...  In starting this endeavor, I'm fully aware of the challenges I'm facing.  This is why I'm going to document about 6 months in advance in preparation for what's to come.  My preparations this year will in every way affect my success with this project in the coming year.  My goal is to eat only what I grow and produce myself on my 2 acre property.  This has been something I've always wanted to do and I hope I'm up for the challenge.  I have only a very few exceptions and a few rules to get me through this journey. 
Rule #1.  Once a month, I can barter something I grew for something else.  The item I receive, however, must be grown/produced by the person I'm bartering with.  For example:  I cannot barter with my neighbor for milk that she bought from a store.  I can also barter something I make from scratch for something someone grows or produces.  For instance, I can trade a wreath I make from scratch for a gallon of milk produced by that person's cow or goat. 
One Exception I'll have to consider is water.  We have public water here.  I will be drinking and using tap water that is not produced by me or this farm.  However, I will use rain water as much as I can.
Exception #2.  Salt.  I have no way of producing salt on this farm, and I live nowhere near salt water, so I'll be using salt that I buy in for preserving, pickling and fermenting.  I am starting my one year journey on January 1st, so I will be relying on food I preserve in the next six months to get me through the winter.
Over the next few months, I'll try to keep lists of what I think I'll need to survive until I start producing greens in the spring.  I'll have to stockpile herbs and leaves that I dry to use for teas and coffee substitutes.  Canning, freezing, drying, fermenting and storing food in the cellar.  This is the time I need to grow as much as possible to preserve what I'll need.  I will not be buying in anything except salt and water for my preserving needs, so my herbs will come in handy for flavor. 
I'm sure you are wondering why I would ever do such a thing.  We have so much abundance in this country and so many things to choose from.  So much convenience.  Why would anyone care about growing everything on site?  Well, one reason is because most people are convinced that it is not possible.  And I hate it when people tell me what to do or not do.  So, I'm in defiance, sort of. 
Another reason for doing this is there is SO MUCH abundance and so many things to choose from without even thinking about it.  We are not doing ourselves any favor by importing virtually everything we eat from hundreds or thousands of miles away.  In my cupboards right now I have coconut oil from Indonesia, Chia seeds which has a label that says "product of Paraguay, Peru, Argentina, Mexico and Bolivia".  Green Olives from Spain, Olive Oil from Italy.  Tuna from CHINA!!!  Organic brown rice from Argentina, Banana Chips from the Philippines, and Hazelnut spread from Germany.  That is just the stuff in my cupboards that is from outside this country.  It doesn't list the many, many, many different and quite far away states some of the other food is coming from.  This is a wake- up call for me as I'm writing this and going through my present food supply.  If I can get just one person to go through their pantry and pay attention to where their food comes from,  I'll have accomplished something, indeed. 
If you think it's not a big deal for us to buy food in huge quantity from far away from our gardens, think again.  And think.  Think about the fossil fuels used to grow the food in huge fields.  Huge fields need tractors and big machines which all take gasoline of some sort.  Processing takes water and fuel.  Packaging is almost always plastic which is made from, can you guess?  Yep, petroleum.  Transporting from farm to factory and from factory to distributer and from distributer to grocery store and from grocery store to your home, all takes fossil fuels.  I haven't even mentioned gmo food and the pesticides needed for them to grow.  And the additives that come from...  somewhere??? in processed foods.
 Now think for a moment what I'll be using when I grow everything I consume for a year.  I have no need for a tractor or large machine, as I will be using a combination of methods to grow my food.  Such as straw bale gardens, the Ruth Stout method (covering the soil with straw to retain moisture, suppress weeds, add fertility) and the Back to Eden garden technique which uses wood chips or any cover for a "no till" process of growing.  Even though the straw we use is not grown on our property it is grown in the same town as us and is brought in all at once in one trip.  We have used our lawn mower with a tow behind tiller for spots in the garden that we have run out of straw or covering, but it gets used once or twice a year for 15-20 minutes.  I don't know how much gasoline that uses in that amount of time, but I bet it isn't as much as I use to get to my shop and back. 
I'm also using nothing but water on my gardens.  I mean NOTHING but water.  I have no use for insecticides, fungicides, herbicides, chemical fertilizers, soil additives or anything I else I have to buy in. When needed, I use the compost from my chicken run.  The chickens eat a very small amount (I mean small) of organic grain, and the rest is bugs, worms and vegetation from the property.  I use some straw which composts and fertilizes in place.  There is no miracle grow.  None. Ever.  We use wood to heat the house and we spread the wood ashes in the garden to supplement the minerals.
The containers I'll be using for canning, freezing and pickling or fermenting are made of glass and I've saved them over the years.  Most of them are canning jars I've purchased at yard sales in this town or the next.  So,  not much footprint there.  I'll use a bit of electricity for freezing and canning.  I'll use my rocket stove outside for much of the canning.  Wood fire from wood grown right here.    And my cellar in this house has a dirt floor.  Perfect for keeping root vegetables.
So, the many reasons I'm doing this is because people say I can't, I'll be creating less of a use for fossil fuels, chemicals, pesticides and gmo's.   And another thing.  My health.  I'm curious to see if I can carry on as a healthy person eating only stuff I grow here.  No health food fads, no supplements from other countries, no protein except for what I can barter for, or what eggs my chickens can produce, no sweets, no exotic fruit, no grains, no alcohol except my wild yeast wine that I make here,  no coffee, no oils.  I'm defying the FDA's "Food Pyramid" and I'm going with what people have eaten for centuries before the industrialization of our food.  My very least and secondary reason for doing this project is to lose a few pounds.  Of course, my priority is to be healthy, but skinny and young is always a bonus.  lol.
In the next few months, I'll be updating and writing lists of things I'm Preserving or "putting up" for the winter.  As well as what I'm growing and planning for the coming year.  I'm so excited about my journey and I hope you'll come along for the ride.  I'm sure we'll both learn some new things in the process.
Until tomorrow.
k.

Monday, May 29, 2017

Straw Bale Gardens How to info and Tips

Straw Bale Gardens are among the many "no till" garden methods practiced by more and more people recently because of the surge of interest in growing your own vegetables.  A few of the benefits of growing on straw bales range from fewer weeds to not having to bend over as far to plant and harvest.  There are many people on the internet showing people how to do this, but all of the ones I've seen have used chemical fertilizers to prepare their bales.  Not only does this make no sense, but it also makes no sense.  And it's also senseless.  I grow my own vegetables to get away from putrid chemicals and poisons.  Putting chemicals on the soil in any form kills the worms and soil life that is supposed to be breaking down the straw to make compost and fertilize the plants you are putting in the bales.  So, here is my step by step instructions on how I did my straw bale garden last year.  At the end of this post, I'll update you on my experiences from last year.

Step one:  Procuring your bales.  Look for bales that are straw for animal bedding or hay that has gotten wet or is too old to use for feed.  People are usually willing to get rid of these for cheaper than buying bales at a store.  Around here, hay or straw can be $5 to $7 a piece.  So doing a whole garden could get crazy expensive.  We found ours last year on Craigs List for $1 a bale because it was just weeds and wild grass that was baled.  The man even delivered it to us for $10, which was reasonable considering what we paid for the bales.  I think we bought 50 bales all together.  It took 2 loads at $10 a load, so we paid $70 for 50 bales.  Worth every penny when you consider what a rototiller costs to buy or rent.  Plus, we have leftovers for this year because we didn't use all the bales and stored them under the awning for the winter.

Step two:  Arranging your bales in the garden.  I put them flat on the ground, 2 deep in long rows where I already had raised bed gardens filled with compost that had pretty much disappeared over the years.  I put newspaper or cardboard under each bale so weeds would be smothered.  This step was not needed though.  The bales smother the weeds just fine by themselves.  Plus, you want the worms and bacteria to get to the bales to help them breakdown.  Use your own judgement when arranging your bales.  I found that a row two deep is not too wide to get to when planting or harvesting.

Step 3: Soaking and getting them to decompose.  You'll want the bales to compost while you grow things in them so your plants will get fertilized as they grow.  I put a layer of chicken pen compost on top of each bales to get things started, but you don't have to do this step.  If you have time ahead of you, just water.  In a rainy season, you won't have to water as much, but to get them prepared, you must keep the bales evenly moist to allow decomposition to happen.  I started in early May last year and they were ready to plant about 3 weeks later because I added compost.  Keep the baling twine on the bales also, you want them to stay together on the ground.

Step 4:  Once you are ready to plant, there are a few things you can do.  Plant directly in the bale, or into a handful of compost stuck into the bale.  I found that already established plants did much better in the bales, but my squash and cucumbers did come up by just putting seeds into the straw and letting the seeds come up.  Another fun thing I did was plant things like beans into the sides of the bales.  Planting the sides adds extra growing footage.  I like the trailing flowers or vegetables in the sides so they fall over the side and plants on the top of the bales can go upright.

One thing I noticed about this gardening method was that I had to water everyday.  The bales dry out fairly quickly.  Of course last year we had a record number of days with absolutely no rain, and this year is the opposite.  We used a lot of the water from our rain barrels last year. But it wasn't enough.  Another problem we had was slugs.  They were so in love with the straw and they kept devouring smaller plants.  Eventually though, these mushrooms started to pop up just at the same time at night that the slugs and snails do.  I think they are ink top mushrooms or something and the slugs left my plants alone to chew on the mushrooms.  Nature has a way of taking care of stuff like that.  I don't know if the snail and slug problem was the result of the straw or not.  I did have old logs around each garden bed and that seems to attract them too.

This year, I am planting flowers on straw bales in the front yard.  I'm going to see if I can fill the top and sides and make it completely full of blooms.  The areas that we planted the bales last year have broken down, so I sort of flattened them out and I'm going to plant in the loose straw.  I took the ties off and spread around the straw.  I'm also going to use the straw this year as a mulch instead of planting the tops of the bales.

All in all, we had fun learning this whole technique.  It still is the very best way to eliminate weeds in your planting.  That worked like a charm!  Until next time, happy planting!
A line of straw bales this winter.  I had my summer squash growing here last year.  I may plant potatoes here this year.

Close up of broken down bales.  New ones are in the row behind.

New bales put down this year on the left.  Last years bales untouched and broken down. 

This bed was hay bales until I shmooshed them all up over the winter and planted nigella flower seeds.

Tuesday, May 9, 2017

Making Wild Thistle Juice to detox yourself and weed your garden

 I thought I'd tell you about something I love to do in Spring when the weeds start coming up all over the garden.  I'm an avid wild food forager and I love learning about new things I can eat that cost me nothing and that grow in my back yard, pesticide free. 
I've been all over the internet looking for benefits of eating this wild plant.  Of course, as with many other things that most people think of as a backyard nuisance or weed, there isn't likely to be much research done on it's usefulness. 
 However, thankfully the Native American Indians always used plants around them and there has been research done on their uses.  They used the thistles as a tea or food to treat neuralgia and overeating.  They also steamed them to shrink hemorrhoids and to treat rheumatism.  They are rich in vitamins A, B & C and contain some minerals.  Of course, I always use common sense about where plants are grown.  If they are grown in good fertile soil, they of course will have more of the good stuff in them.  If you pick your weeds in an abandoned junk yard where motor oil has spilled on the ground for 30 years.... well, you get the picture.
 Most thistles that grow around me are edible, so here is what I do with the thistles that take over my garden every spring.  If you can't beat em, eat em!
 I just take my machete and my garden gloves out to the patch where the thistles are growing.  I pull them up root and all.  If they don't cooperate, that's why the machete comes in handy...  slice them under the soil so as much of the root comes with the plant.  That way you have a better chance of the thistle to not come back.  Thistles, left to flower can release thousands of seeds in just one year.  The next year they will be all over your garden.  It is best to keep them in check.  Another reason to eat them....
 Here's my harvest of Canada Thistle. There are many different kinds of wild thistle.  Do your own research on this before eating any wild vegetation, of course.  The thistles that grow around here are sow thistle, milk thistle, canada thistle, bull thistle and many more.  These are common names for these plants, and each state or region has their own.
 I use a big bowl of some sort, but I always have more thistles than I could ever use.  You can see from the pictures my garden uses all manner of covering the ground as nature intended.  Wood chips, pine needles, leaves, straw.  Covering the ground adds benefits like nothing else. 
 The boys help me wash all the dirt off.  Most of the time I bring in catnip from the garden so they think I'm hiding catnip in between the leaves of thistle somewhere...
 The Baby inspects...  He loves running water so of course he is in any sink that is flowing.  He plays with the water and tries to bite it.  Life is so much more fun with cats.
 I use a juicer that I bought from Ebay for a fraction of what it cost new.  It was slightly used.  Probably something someone got as a gift, used it once and thought it was too much trouble.  Juicers are a bit clunky.  They take up lots of room.  They are a pain to wash.  You have to wash the bits of vegetation off the inner parts immediately or it's a nightmare to get them off.  I use a little brush that is used to clean vegetables.  That gets all the bits.  My juicer is a Jack Lelain juicer.  Sorry if I misspelled his name. I like this one because you can juice greens really easily.  Some juicers I've had in the past just spit out most greens without actually getting the juice out.  I love watching the infomercials on this juicer.  Jack was a cool guy.
Of course, if you do not have a juicer, by all means, don't omit this healthy stuff from your life!  Use your blender.  Just add a small amount of water and mix.  Then strain out the pulp.  I use cheese cloth or a jelly bag.  You can buy jelly bags anyplace you'd buy canning supplies.  They work great for all sorts of straining and you can wash and reused them. 
 I am also using some cleavers in this mix.  Cleavers are a great spring tonic for detoxifying the lymph system.  I try to change up all my vegetables to get everything during the week.  If I keep eating healthy, I can drink more wine!  It's all about give and take, you know? 
 The first drop of juice!
 Roots and all!  Don't worry, the pricklies aren't in the juice when it's finished.  If you are worried about getting those nasty needle like thingys stuck in your throat, you can strain the juice when you're finished.  Use a jelly bag or cheese cloth like a said before.  Coffee filters will do the trick, but it will take a month for all the juice to go through.  Plus, the pores in a coffee filter are too small and I'm afraid the good fiber and pupl and minerals will be strained out of your juice if used.  You want a little of the fiber left in it.

 Cali is sniffing to make sure she doesn't need this in her diet...
 And the finished product!  It's so pretty.  Tastes like wheat grass but a little wild.  You don't need much of this stuff.  It is very potent and detoxifying.  Lots of good vitamins to keep you going!  
If you don't like the taste of grass or other wild stuff, you can juice an apple with this to sweeten it up.  Or if not using a juicer, add juice to the blender instead of the water.  Whatever you have to do to get this down!  Bottoms up!
If you like this sort of thing, don't forget to click the "Follow" button to follow me.  You can also see what's going on with the store and my gardens on The Blue Lady facebook page.